Reality Bites

~ by Omi Azad

  • Home
  • About Me!
  • My Movies
  • বাংলা

Category Archives: Microsoft

Metered Connection in Windows 10

12 Wednesday Aug 2015

Posted by Omi Azad in Microsoft, Tutorials

≈ Leave a Comment

Tags

Wi-Fi, WiFi, Windows 10

Microsoft may say that Windows 10 is the most polished Operating System they have ever made. If you ask my opinion, I would say they are wrong. Windows 2000 is the most polished operating system ever. 🙂

Well whatever I think, that would not stop them from doing whatever they are doing. So if we want to stay up to dated, it is better to cope ourselves up with whatever they are delivering or keep using with whatever we are comfortable with.

Some Internet service providers can charge by the amount of data used (the amount of data sent and received by our PC). That is called a metered Internet connection. These plans often have a data limit, and if you exceed the limit you might have to pay extra or in some cases, you are not charged extra but your connection speed becomes slower until the billing cycle ends.

If you have a metered Internet connection, setting your network connection to metered in Windows can help you reduce the amount of data you send and receive. Now Metered Connection is a very useful feature since it has been introduced first with Windows 8. Once you set a WiFi/(3G/4G) Dial-up connection as metered connection, your bandwidth usage would be limited. Unfortunately you cannot set a LAN connection as metered.

Setting a metered connection was super easy in Windows 8 and 8.1, just right click and set. But it became a bit complication in Windows 10. Maybe ISPs have asked Microsoft to hide that so that they can make more money. 🙂

So here is how to set your connection as metered in Windows 10.

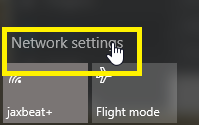
To start, click on the WiFi connection in the taskbar on the far right side and select Network settings at the bottom of the panel that pops up. This will open the Settings app.
2015-08-12 21_29_20-Network Connections

You can also just open the Settings app and click Network & Internet > Wi-Fi. The Settings app lets you set a WiFi connection as metered.

At the bottom of the Wi-Fi screen select Advanced options.2015-08-12 21_31_17-Settings

This opens the advanced settings for the WiFi access point you’re currently connected to. Next, scroll down to Metered connection and turn the slider to On under Set as metered connection.

2015-08-12 21_31_49-Settings

That’s it. You’re done!

So these are the things you will get once you turn metered connection on:

  • Windows Update will only download priority updates. (This is good, cause there is no way to turn Windows Update off in Windows 10)
  • Apps downloading from the Windows Store will be paused.
  • Start screen live tiles might stop updating.

The next time Windows 10 has an update ready, you’ll be notified that an update is available for download. You can either grab it then or wait until you’re on a non-metered connection.

Enjoy!

Anti-Virus for Windows 10

04 Saturday Jul 2015

Posted by Omi Azad in Microsoft, Software Review

≈ Leave a Comment

Tags

10, Anti Virus, Preview, Technical

Many of us are already using Windows 10 Technical Preview. No matter how unfinished the product is or how lousy the performance is, we need protection from virus and related threats.

As I am using Windows 10 Technical Preview for quite sometime, many of my friends have been asking me about anti-virus solution for Windows 10. Here some of the common answers for my friends and readers:

  • Are we able to install Microsoft Security Essentials in Windows 10 Technical Preview?
    No, we only can install Microsoft Security Essentials on Windows 7 and Windows Vista (there was a version available for Windows XP, but unfortunately that is discontinued). For Windows 8, Windows 8.1 and Windows 10 Technical Preview we already have Windows Defender pre-installed by Microsoft, which is great Anti Malware protection and is a replacement for Microsoft Security Essentials. We don’t need to do anything, just open start and search for Windows Defender and make sure it is enabled and up-to-dated through Windows Update.
  • What Anti-Virus should we install for Windows 10 Technical Preview?
    In my opinion, we do not need to install any Anti-Virus program as of now, because we already have Windows Defender. It protects us against Virus, Worm, Trojan, Spyware, Adware and other malicious programs same as what Microsoft Security Essentials is doing in Windows Vista and Windows 7. But if you do not trust Microsoft and want to have some exclusive anti-virus protection, here is the list of anti-viruses I have tried myself and worked successfully:

    • Avast Antivirus (Working on 28th May 2015)
    • Bitdefender Antivirus Free 2014 (some of my friends are still complaining that this is not working, it worked for me on a fresh installation and you can also give it a try)
    • AVG Free Antivirus
    • Avira Free Antivirus 2015
    • 360 Total Security
    • AVG 2015 Internet Security (I tried the trial one, without license)
    • McAfee Total Protection (I tried the trial one, without license)
    • McAfee All Access Security (I tried the trial one, without license)
    • ESET Endpoint Security (I tried the trial one, without license)
    • Panda Free Antivirus 2015 (Some says this did not work for them. Worked for me on a fresh installation of Windows 10)
  • Are we able to install other Anti-Virus software?
    Many have reported about compatibility issues with current Anti-Virus programs in Windows 10 Technical Preview. But the above list is created based on my personal experience and I hope this will also be useful for you. I also believe after the final release of Windows 10, Anti-Virus companies will make their applications more compatible and useful with the operating system.

Please leave a comment if you have any question in this regards.

Fix – Windows 8 “Change PC Settings” Not working

28 Sunday Apr 2013

Posted by Omi Azad in Microsoft, Tutorials

≈ 17 Comments

Tags

microsoft, windows

While facing the same problem I Googled about it and found I’m not the only one. Well, let me explain the problem for you. When I open the Windows 8 Charms Bar and click on Settings gear icon and then click on the Change PC Settings link on the bottom of the page, nothing happens!!

I went to this Microsoft Answers page and found an experienced Microsoft MVP gave a funny suggestion, which is to restore your Windows to previous condition. Dude, seriously! We just cannot roll our system back to some old stage.

So I used my head and tried to remember what I did wrong and how I can correct this. For me, it’s not possible to roll back to anywhere. Maybe my MVP friend have plenty of time, but unfortunately I don’t.

Then I remember that while playing with my start menu items, I have deleted the PC settings shortcut. This also happens if someone installs a 3rd party start menu and customizes that.

PC Settings

So I went to C:\ProgramData\Microsoft\Windows\Start Menu\Programs on a friend’s PC. Took the PC settings shortcut and put it in the same location on my PC.

Yahoo! it’s fixed!!

Well if you are suffering from the same problem and thinking where to get the shortcut from as you may not have any friend running Windows 8. Well, don’t worry, lit me help you in few easy steps-

  • Download the zip file from here.
  • Extract it and you’ll get the PC settings shortcut in there.
  • Put the shortcut in C:\ProgramData\Microsoft\Windows\Start Menu\Programs (You cannot move the shortcut to that place. You have to copy paste)

And you are good to go. Let me know how it went with you.

Easily Download Windows Phone SDK

28 Monday Nov 2011

Posted by Omi Azad in Microsoft, Tutorials

≈ 3 Comments

Tags

.NET, Development, Download, SDK

As you may know that Windows Phone is the latest mobile phone OS by Microsoft and got very good attention from the end users. Microsoft is strongly leveraging the Windows Phone 7 platform. Unlike Google or Apple, they are trying to engage developers from around the world to make their Marketplace richer. It’s a great opportunity that developers from around the world can legally develop and sell Windows Phone Applications on the Marketplace.

To start developing, you can download the Windows Phone SDK Online Installer from here or the Offline Installer from here and start developing.

For those who do not want to download the big files can use an alternate method. The download will be smaller in that case but you need to have Visual Studio 2010 (or higher) installed on your computer.

  1. You need to have Visual Studio 2010 installed on your computer.
  2. You also need to have Visual Studio 2010 Service Pack 1.
  3. Download & install Microsoft Web Platform Installer (Web PI) from here.
  4. Run Web PI as Administrator-

    ..
  5. After some time, it will refresh the product list. Once you see the list you can find Windows Phone SDK there. Click on the Add button-

    ..
  6. You can see the Windows Phone SDK’s size is less than 4MB.

    You can hit “I Accept” button to get going. In total you will not download more than 15MB 🙂

Once your application is ready, you can go to http://create.msdn.com/ and publish your app to the marketplace.

Developers from some country may not find their name listed on the website. Well, don’t get upset as Microsoft has Global Publisher Program for you. To know more about Global Publisher Program please visit the Global Publisher page on MSDN.

Enjoy developing and make money 🙂

Demo of IE9 (with enhanced Bing Search Experience)

18 Saturday Sep 2010

Posted by Omi Azad in Microsoft, Software Review

≈ 3 Comments

Tags

মাইক্রোসফট, ইন্টারনেট, বিঙ, এক্সপ্লোরার

ইন্টারনেট এক্সপ্লোরার ৯ ডাউনলোড করার জন্য এই সাইটটি ভিজিট করুন।

← Older posts

Proudly powered by WordPress Theme: Chateau by Ignacio Ricci.