Reality Bites

~ by Omi Azad

  • Home
  • About Me!
  • My Movies
  • বাংলা

Category Archives: Tutorials

Metered Connection in Windows 10

12 Wednesday Aug 2015

Posted by Omi Azad in Microsoft, Tutorials

≈ Leave a Comment

Tags

Wi-Fi, WiFi, Windows 10

Microsoft may say that Windows 10 is the most polished Operating System they have ever made. If you ask my opinion, I would say they are wrong. Windows 2000 is the most polished operating system ever. 🙂

Well whatever I think, that would not stop them from doing whatever they are doing. So if we want to stay up to dated, it is better to cope ourselves up with whatever they are delivering or keep using with whatever we are comfortable with.

Some Internet service providers can charge by the amount of data used (the amount of data sent and received by our PC). That is called a metered Internet connection. These plans often have a data limit, and if you exceed the limit you might have to pay extra or in some cases, you are not charged extra but your connection speed becomes slower until the billing cycle ends.

If you have a metered Internet connection, setting your network connection to metered in Windows can help you reduce the amount of data you send and receive. Now Metered Connection is a very useful feature since it has been introduced first with Windows 8. Once you set a WiFi/(3G/4G) Dial-up connection as metered connection, your bandwidth usage would be limited. Unfortunately you cannot set a LAN connection as metered.

Setting a metered connection was super easy in Windows 8 and 8.1, just right click and set. But it became a bit complication in Windows 10. Maybe ISPs have asked Microsoft to hide that so that they can make more money. 🙂

So here is how to set your connection as metered in Windows 10.

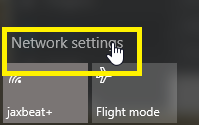
To start, click on the WiFi connection in the taskbar on the far right side and select Network settings at the bottom of the panel that pops up. This will open the Settings app.

2015-08-12 21_29_20-Network Connections

You can also just open the Settings app and click Network & Internet > Wi-Fi. The Settings app lets you set a WiFi connection as metered.

At the bottom of the Wi-Fi screen select Advanced options.2015-08-12 21_31_17-Settings

This opens the advanced settings for the WiFi access point you’re currently connected to. Next, scroll down to Metered connection and turn the slider to On under Set as metered connection.

2015-08-12 21_31_49-Settings

That’s it. You’re done!

So these are the things you will get once you turn metered connection on:

  • Windows Update will only download priority updates. (This is good, cause there is no way to turn Windows Update off in Windows 10)
  • Apps downloading from the Windows Store will be paused.
  • Start screen live tiles might stop updating.

The next time Windows 10 has an update ready, you’ll be notified that an update is available for download. You can either grab it then or wait until you’re on a non-metered connection.

Enjoy!

How I Listen to International Music Legally

11 Thursday Jun 2015

Posted by Omi Azad in ICT World, Software Review, Tutorials

≈ Leave a Comment

Tags

Music, Software, Spotify, VPN

Well, I respect intellectual properties and I try my level best not to use anything illegally. I stopped using pirated software years ago and since almost a year I do not listen to pirated western and Bangladeshi music. Well now the question is how. The answer is simple. For Bangladeshi music, I buy original CDs, as they are super cheap.  For western I am depended on Spotify. Well may be Taylor Swift is not on Spotify but I can live without her music. 😉

Spotify’s slogan is “Music for Everyone” but unfortunately it is not. You have to live in one of those countries where Spotify operates and unfortunately they do not operate in my country Bangladesh!

Spotify has two types of subscription, Free and Premium. Free is ad supported music streaming service with some restrictions and premium gives you freedom to listen to your favourite music wherever and however you like, even when you not connected to the internet. But unfortunately everything is limited to the countries they operate. Now if you have money and want to become a paid premium subscriber, you cannot just do that. So how I am doing it!!

Well, I did some research and decided to avail the service using VPN. With VPN (virtual private network) you can have secure and new network footprint. Almost all Internet connections of Bangladesh are routed through Singapore, so getting both Spotify and VPN service from Singapore would be the perfect blend. I have subscribed to Express VPN because they have 3-4 servers in Singapore and I can access their service from almost all the devices I own. I have a long term agreement with them, I have paid for a year and getting the service for 20 months. So it a good deal for me.

I have subscribed to Spotify Premium with Singapore Dollars 9.99 per month and I have the freedom to listen to whatever I would like to. I do agree that this is not 100% legit way to avail the service, but at least I am not cheating the artists.

I do encourage everyone to avoid using illegal/pirated materials.

Cheap International Calls from Free Bhutan Telecom (B-Mobile) Tourist SIM

30 Wednesday Jul 2014

Posted by Omi Azad in ICT World, Telecom, Tutorials

≈ Leave a Comment

Tags

2G, 3G, Bhutan, Cheap, Free, Guide, Internet, Mobile, Prepaid, Tariff, Telecom, Tourist

As soon as you arrive in Paro international Airport - Bhutan, you can avail a Prepaid tourist SIM card for free from Bhutan Telecom (B-Mobile) by just giving them your passport number and filling up a simple form. The SIM comes with Nu.100.00 preloaded, so you have to pay that upfront.

After completing all immigration procedures, you will see Bhutan Telecom counter right beside the money exchange counter (by they way use this money exchange counter to exchange your currency as they provide the best rate than outside banks). Any ways, let’s go back to our topic. Just walk in and ask for a Prepaid Tourist SIM. Most of the time they do not have any Micro/Nano SIM, so if your phone do not take regular size SIM card, you have to cut it from outside shops. Your taxi driver or travel guide may help you with that.

B-Mobile’s international tariff is quite high, but there is a very good way you can make cheap international calls as low as Nu.4.00 per minute. Unfortunately this is not mentioned anywhere on their website or promotions. To make that, just add 010 in front of your number. So the number format would be:
010 – Country Code (without 00 or plus + sign) – number.

For example if I want to call a Bangladeshi number +8801712345678, the format for cheaper tariff number would be:
0108801712345678. Like that if I want to call +6141765432 in Australia, the format would be:
0106141765432. I hope you get it by now.

And pay as you go 2G/3G is also quite reasonable for email or social networking. The SIM card will say it comes with 3G pre-activated but I did not find my one working. So if that is also your case, you can  just call 1600 from the number for free, follow the IVR to talk to an agent and they’ll activate that for you. Bhutan do not have very good 3G coverage, but 2G works fine everywhere where you have network coverage. So never set your phone to use 3G/4G only.

Oh! and set internet as Access Point Name in your phone to get the internet working for you.

Fix – Windows 8 “Change PC Settings” Not working

28 Sunday Apr 2013

Posted by Omi Azad in Microsoft, Tutorials

≈ 17 Comments

Tags

microsoft, windows

While facing the same problem I Googled about it and found I’m not the only one. Well, let me explain the problem for you. When I open the Windows 8 Charms Bar and click on Settings gear icon and then click on the Change PC Settings link on the bottom of the page, nothing happens!!

I went to this Microsoft Answers page and found an experienced Microsoft MVP gave a funny suggestion, which is to restore your Windows to previous condition. Dude, seriously! We just cannot roll our system back to some old stage.

So I used my head and tried to remember what I did wrong and how I can correct this. For me, it’s not possible to roll back to anywhere. Maybe my MVP friend have plenty of time, but unfortunately I don’t.

Then I remember that while playing with my start menu items, I have deleted the PC settings shortcut. This also happens if someone installs a 3rd party start menu and customizes that.

PC Settings

So I went to C:\ProgramData\Microsoft\Windows\Start Menu\Programs on a friend’s PC. Took the PC settings shortcut and put it in the same location on my PC.

Yahoo! it’s fixed!!

Well if you are suffering from the same problem and thinking where to get the shortcut from as you may not have any friend running Windows 8. Well, don’t worry, lit me help you in few easy steps-

  • Download the zip file from here.
  • Extract it and you’ll get the PC settings shortcut in there.
  • Put the shortcut in C:\ProgramData\Microsoft\Windows\Start Menu\Programs (You cannot move the shortcut to that place. You have to copy paste)

And you are good to go. Let me know how it went with you.

Easily Download Windows Phone SDK

28 Monday Nov 2011

Posted by Omi Azad in Microsoft, Tutorials

≈ 3 Comments

Tags

.NET, Development, Download, SDK

As you may know that Windows Phone is the latest mobile phone OS by Microsoft and got very good attention from the end users. Microsoft is strongly leveraging the Windows Phone 7 platform. Unlike Google or Apple, they are trying to engage developers from around the world to make their Marketplace richer. It’s a great opportunity that developers from around the world can legally develop and sell Windows Phone Applications on the Marketplace.

To start developing, you can download the Windows Phone SDK Online Installer from here or the Offline Installer from here and start developing.

For those who do not want to download the big files can use an alternate method. The download will be smaller in that case but you need to have Visual Studio 2010 (or higher) installed on your computer.

  1. You need to have Visual Studio 2010 installed on your computer.
  2. You also need to have Visual Studio 2010 Service Pack 1.
  3. Download & install Microsoft Web Platform Installer (Web PI) from here.
  4. Run Web PI as Administrator-

    ..
  5. After some time, it will refresh the product list. Once you see the list you can find Windows Phone SDK there. Click on the Add button-

    ..
  6. You can see the Windows Phone SDK’s size is less than 4MB.

    You can hit “I Accept” button to get going. In total you will not download more than 15MB 🙂

Once your application is ready, you can go to http://create.msdn.com/ and publish your app to the marketplace.

Developers from some country may not find their name listed on the website. Well, don’t get upset as Microsoft has Global Publisher Program for you. To know more about Global Publisher Program please visit the Global Publisher page on MSDN.

Enjoy developing and make money 🙂

← Older posts

Proudly powered by WordPress Theme: Chateau by Ignacio Ricci.